Naming Warehouse Locations – 5 Mistakes You Must Avoid
Designing the nomenclature for warehouse locations is a critical step toward achieving operational efficiency. Here are the mistakes you must avoid and how to ensure you get this right from the beginning.

I have designed and redesigned many warehouses for location label nomenclature, WMS setup, label position, label format, barcodes, check digits, you name it. I’m telling you that most warehouses get this wrong.
Naming Warehouse Locations
Location creation in a warehouse is somewhat similar to air travel. When you leave for the airport, you first need to know what terminal you are going to. If the airport has five terminals, you’ve narrowed the list of gates from 250 to 50, an 80% improvement.
Once in the correct terminal, you must know which gate to seek. Airport gates are labeled from low to high, starting with entering the terminal. Odd numbers are typically on the left and even on the right. This is because we read left to right, and where the lowest terminal number is 1, that is typically the first gate on your left.
Once you board the plane, the row and seat number are the final components to make it to your seat. The row is listed first in numerical format, and the seat is listed second using an alphanumeric character. First, you learn how far to travel into the plane and then, once in the correct row, which seat.
Why this is important
This location string lets you visualize where you are going before you arrive at the airport. If the airport has five terminals, and you are leaving out of terminal three, you will probably be in the middle of the airport.
If your gate is 25 and the total number of gates in your terminal is 50, you will probably be in the middle of the terminal on the left side. Similar logic exists for your row and your seat once you board the plane.
Why Location Nomenclature is So Critical Part I
Your location creation will certainly influence the overall efficiency of your operation, similar to an airport. You want to visualize where you are going before you begin your journey. Setting up your warehouse follows the same logic, and setting it up correctly will pay dividends far beyond your tenure.
But, if you get this wrong, it is almost impossible to change. You do not want to put inventory into a location and then change that location while you are live. You will have open putaway tasks, replenishments, cycle counting, etc., tied to that specific location. Your inventory research will be impossible if you change these locations once your operation is live.
One additional concern: some warehouses have ‘open tasks’ that do not get completed. This drives inventory issues and creates a research process using this data. This is why re-labeling a warehouse is next to impossible to accomplish.
Why Location Nomenclature is So Critical Part II
The locations that you create will become the road map for associates to find them. For example, aisle 99 may become your warehouse reference for the back wall. Or if you are in three different buildings, locations labeled 100 could be synonymous with building 1, 200 for building 2, etc.
Another example, if you have bulk product at one end of the building, knowing that aisles 1 to 20 reference a bulk stack location is an easy way to learn and memorized this location mapping in your head.
Where this saves you so much efficiency is when communicating these locations to others. Similar to an airport, if I tell you to go to location 12-24 then you know you are going to aisle 12 and location number 24 (bulk location example). This makes it very simple.
Pro Tip: Typically your WMS/IT team is going to convince you that you must have zone in the location name and maybe a vendor code, etc. The location turns into some long string like 200-24-17-A12. Many times this is because they designed these criteria into their software and need all of these inputs when communicating with RF devices. Fear not – you can put whatever string of characters they need in the label barcode but you do not need to display them on the label.
Why Location Nomenclature is So Critical Part III
Science has taught us that the ideal number of digits for easily remembering warehouse locations depends on a few key factors:
1. Short-Term Memory Capacity: The average human short-term memory capacity is 7 +/- 2 items. This means most people can reliably hold and recall 5-9 items without needing to rehearse or write them down.
2. Chunking: We can improve memorization by “chunking” information together. For example, if a location code is presented as “A23B5,” we can chunk it into “Zone A, Aisle 23, Bin 5.” This allows us to leverage our long-term memory for familiar patterns (letters and numbers) while reducing the number of separate items to remember in short-term memory.
3. Familiarity with Coding Systems: Warehouse workers who regularly use a specific location coding system will be more comfortable with longer codes due to familiarity with the format and logic behind the system.
Recommendations for Warehouse Location Codes
Based on these factors, here are some recommendations for the number of digits in warehouse location codes:
- Ideal Range: Aim for a total code length between 4 and 7 digits for optimal memorability. This allows for some chunking while keeping the overall code concise.
- Shorter Codes (3 Digits): Consider using 3-digit codes only if the warehouse is relatively small or if the code is combined with a visual map or picking technology to aid worker navigation.
- Longer Codes (8+ Digits): Codes exceeding seven digits become increasingly difficult to remember and can lead to picking errors. If more information is needed, consider a hierarchical system with a zone identifier followed by a separate, shorter code for specific locations within that zone.
Additional Considerations
- Mixing Letters and Numbers: Incorporating letters and numbers can create more memorable chunks (e.g., “B14C”). However, avoid using letters that can be easily confused visually, such as O and 0.
- Logical Progression: If using sequential numbering, ensure the system progresses logically within each zone or aisle to aid in spatial understanding.
- Training and User-friendliness: Train workers on the location coding system and ensure it’s clear, logical, and easy to understand.
By considering these factors and conducting user testing with warehouse workers, industrial engineers can develop a location coding system that balances memorability, efficiency, and user-friendliness.
Setting Up Your Warehouse
Setting Up Your Warehouse
Define Your 0,0,0 Position (x,y,z coordinates)
When designing locations, you need to pick one point in the warehouse that will be your starting point. Here are some tips to help you decide where that should be:
- Your 0,0,0 point should be the one corner of the warehouse that will never change. If you expand the building or add more locations in the front, back, side, then this will destroy your hard work.
- If you are using space in the middle of a warehouse, possibly leased space or an annex, make sure you leave characters available if you ever acquire this additional space. Here is a simple example:
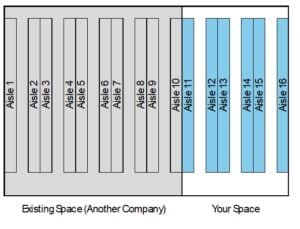
You might now know how the existing space is being used, so make sure to request the entire building layout so you know where to start your numbering. Remember that starting your locations at aisle 11 has no bearing on your operation. If you start at 1, then in the future you do acquire that space, you are going to have to use a higher numbering sequence or systemically bin move all of the inventory, which is risky.
The last thing you want is a building with positions 1-50 in the middle and locations 60-70 on the wrong side. What always happens – people travel to aisle 50, looking for aisle 60 – and the wrong end of the building. You don’t want this.
Pro Tip: When trying to determine where to start you 0,0,0 point, consider the entire building layout. I like to use the receiving dock as the first 0 point plane, considering your reserve locations will increase as you move away from the dock. The second 0 point should be the landlocked wall, one that will not be removed in the future for expansion.
Location Naming Nomenclature
Just like creating locations, I’m going to keep this simple. I recommend using a two digit aisle, dash, two digit bay, dash, two digit position (non-bulk locations).
18-24-32
Here’s why:
- What aisle am I going to? 18
- Which bay? 24
- Which level? 3
- Which Position? 2
Let’s assume you are driving equipment. The first thing you want to know is which aisle you are going to. Then you want to determine the quickest travel route, avoiding congestion at all costs.
If you are going to bay 24 and the aisle has 54 bays, then you might be able to enter the aisle from the middle, if you have a break in the aisle, versus traveling down the aisle from one end or the other.
The last thing you want to run into is another piece of equipment so this helps you navigate your entry into the aisle before you get anywhere near it.
Once you get into the aisle you want to get to your designated location as quickly as possible. So let’s assume you enter the aisle at the beginning, which is bay 11 on the left and 12 on the right.
Now you remember that you are going to a location on the right hand side. Next, you can adjust your speed to quickly travel from bay 12 to 20, and then start to slow down after that.
While you travel the last 20 feet, you look to see what level you are going to and if possible, start your vertical travel to the third shelf (pallet position) as you finalize your horizontal travel.
Finally you see that the position is 2 so you travel past the first position (first pallet) and stop at the second position.
This methodology works in all areas, whether you are on equipment or on foot. When you know where you are going, you can visualize the best possible travel path.
Bulk Location Naming and Labeling
Bulk Location Naming and Labeling
These are my recommendations for a bulk floor or bulk pallet layout. Two digit aisle, dash, two digit location. That’s all you need. Remember if your WMS team has to have a position in the location string, no problem.
Just put this in the barcode they scan but not on the sign. And if you aren’t scanning a barcode, then your WMS team can add these additional characters automatically anytime you enter one of these locations.
Do the work one time up front and never have to name every bulk location 29-01-11, 29-02-11, etc. The extra “-11” is unnecessary.
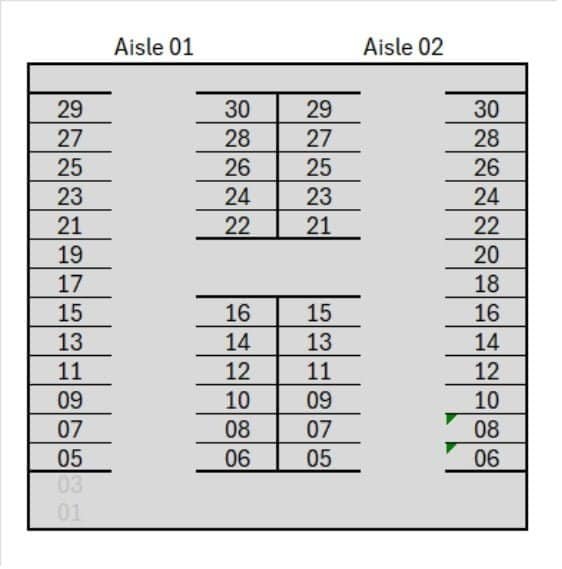
1. The starting point for picking is the lowest aisle and position. The ending point is the highest aisle number and lowest position. You want to “U” pick bulk (if you are piece picking).
2. As shown in aisle 01, leave spacers (shown in light grey, 01, 03) for every possible location that exist in the future. If that means your first location is 23, so be it. This way you can always add these locations in without having to change existing locations.
3. Same concept when you create an aisle. During times of capacity these middle locations may need to be used and when you leave space now, adding them in the future will be easy.
4. Bulk or full pallet locations should be named using a two-digit aisle and a two-digit position. That’s it. Remember, any additional data needed for your WMS can be hidden in the barcode.
Bulk Signage
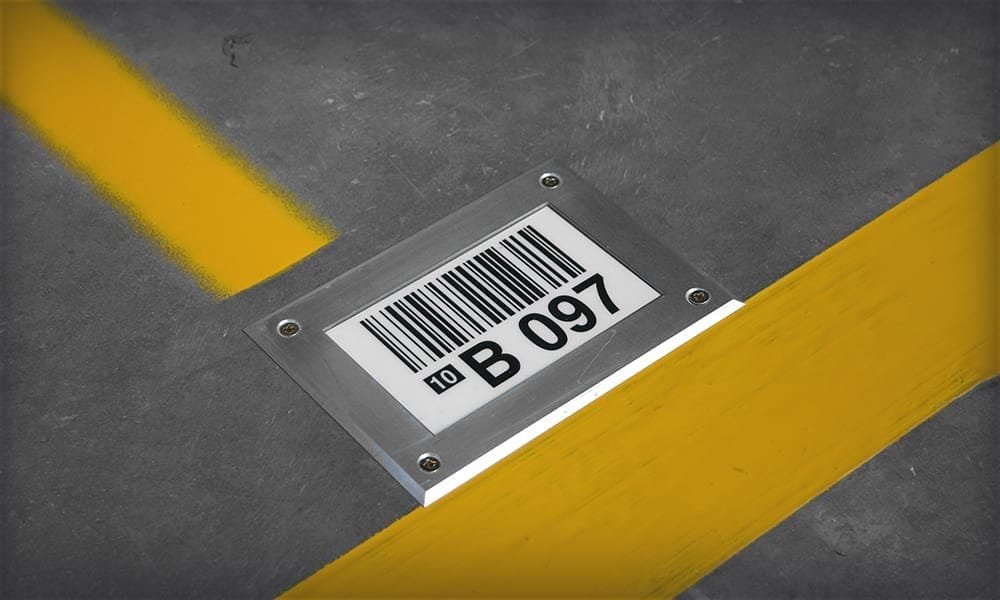
These are the three types of location signs I’ve used for bulk locations.
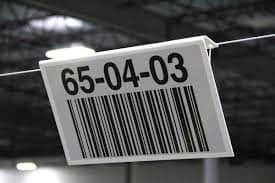
Hanging Signs: These work well when you are not stacking product higher than 3 pallet positions (approx 16′). You can purchase these signs from a vendor and have your maintenance team hang electrical conduit on chains from the ceiling.
This method works best for sustained location signage, as long as you are not hitting the conduit. Make sure you put them at the correct height and your scanners can hit the barcode.
These probably work the best, but they are the most expensive. If your folklife operators like to push and pull their pallets versus moving them in and out properly, then these are not for you. They are not destructible but provide the best solution for neat and clean warehouses.
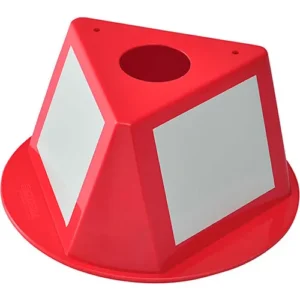
These provide a good temporary solution before you install another option. The problem with these is they disappear and get crushed. And when you are using them as a specific location identifier, when pallets get put away or replenishment from these locations, the cone gets moved to the adjancent location and never replaced. Now you have inventory issues.
Floor Striping
Here are my recommendations for striping a bulk floor.
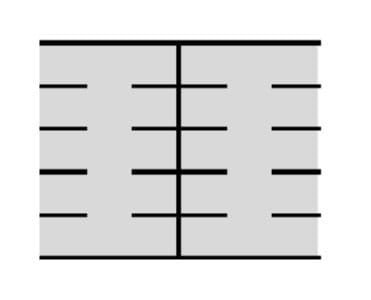
- For full pallet locations (42″x48″), make the locations 4′ wide and 4′ deep for each pallet position. The lines should be painted on 4′ centers.
- Take a tape measure and place tick marks on the floor every 4′ exactly.
- Snap a chalk line and make sure you double check the lines before painting – use the concrete divisions.
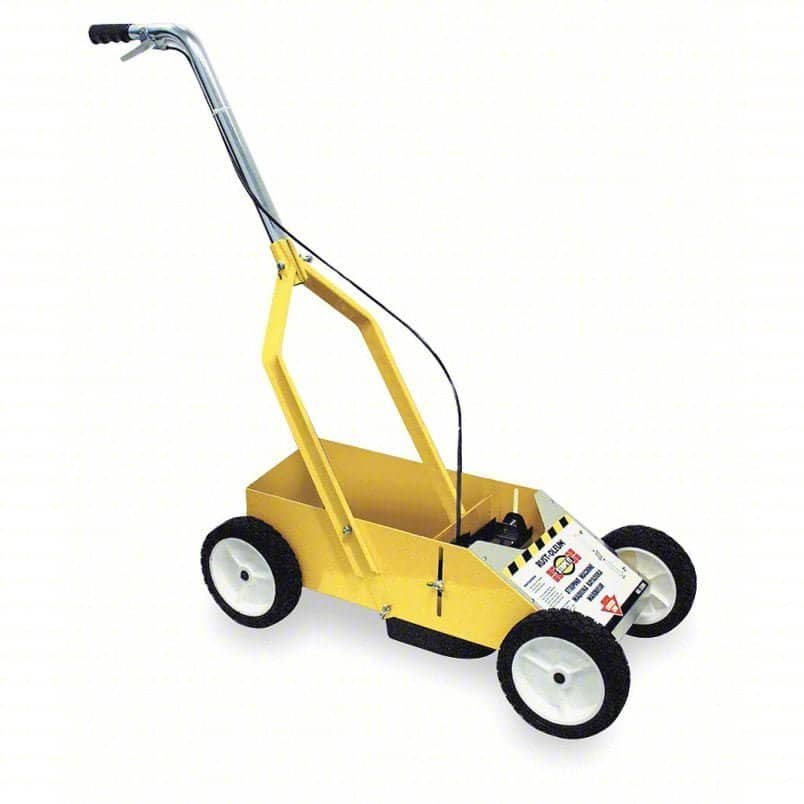
You must use quality (expensive) paint unless you want to re-stripe monthly and a line sprayer (shown on the right, about $300). Do not tape and paint these lines. It takes too long and the quality is the same.
Remember that when your bulk floor is empty, any blemishes will show up. But once you put product in these locations, all is forgotten – so relax and get it done.
Pallet Storage Locations
Pallet storage locations should be six digits and mirror each other from front to back, following your 0,0,0 logic. Here is an example showing the first level locations:
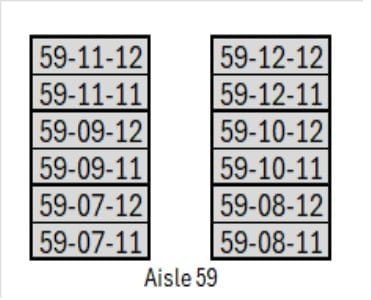
Can you see how the locations mirror from front to back (59-07-11 mirrors 59-08-11)? This is critical in establishing consistency from a location nomenclature standpoint.
When you are driving up and down the aisles, the position closest to your 0,0,0 point needs to remain consistent, regardless of the aisle side.
Note: In a past experience, we assigned bay locations from low to high as discussed, but we numbered both sides from left to right, thinking that when you stop at the bay, the lowest number is always on your left.
This did not work because when you are Z-picking (going back and forth between sides, it was too confusing and time consuming to reset your thinking. When the highest position is always furthest from the inbound area, it makes finding these easier.
Case Pick Locations
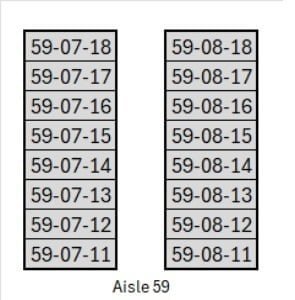
Case picking locations follow the same logic as the pallet storage locations. The only difference is that you have more locations. Here is an example of one aisle, two bays:
Again, the locations mirror each other from front to back.
One note here: If you have more than 9 positions, for example on a 12′ wide rack, you may want to make the shelf heights small and the shelf widths 9 or less. The only other option is to introduce an additional character for all case pick locations, such as 59-08-101.
Pick to Belt Locations
Pick to Belt Locations
If you are picking 100% of your cases from full pallet locations, then I recommend following the same nomenclature as suggested for bulk. Again, there is no need for a level and position indicator.
Some people may express concern with this because the back side of a pick to belt area typically looks like a reserve aisle, especially if this is a picking module.
When you use a different numbering system, some believe associates will get confused when placing pallets into these different locations. They do not mirror in this aisle, like every other aisle.
The benefits of having your pick to belt locations four digits vs. six digits is worth the sacrifice. Your picking accuracy is higher when only picking from 4-digit locations.
Which location list would you rather pick?
60-07-11, 60-07-12, 60-09-12 or
60-06, 60-07, 60-09
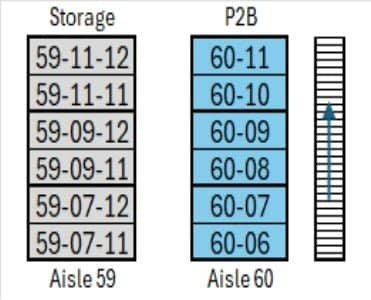
Productivity and accuracy are both higher using the 4-digit locations in Pick to Belt (Full Case Picking) and Bulk Picking.
Unit or Each Pick Locations
Unit locations follow a similar location mask as the reserve or storage locations with one primary difference. If you have an obstacle within a bay that prevents you from creating a location, do not skip locations.
In a typical unit pick module, whether you are picking from static shelving or carton flow, the sizes of the locations change, or at least they should unless you are using pick to light.
WMS systems handle replenish quantities and min max triggers differently, Sometimes when SKU demand exceeds active location supply, a second facing is added. Or when adding a SKU to your pick face, the dimensions are different from the previous SKU, requiring the location width to change.
We cover these strategies in depth in another blog post, but for now, you want you picking faces to look like this, from a location naming standpoint. This is a three shelf example:

As you can see the locations are not aligned from top to bottom. This is okay because when you are unit picking and looking for a specific location on each shelf, you use the other locations to direct you in the right direction.
Position 04 is always to the right of position 03 on the shelf you are picking from. This is even more critical when you are missing location labels, which is unacceptable – period!
The other component here is the stocking aspect, whether from either the front or back of the location. Mis-stocks are common in most operations so this location best practice has proved to be the best method.
Additional Characters or Symbols to Add
One thing we haven’t covered yet is where you can add additional characters on your location labels. Additional characters include an arrow (up/down) or a check-digit. These are the only two additional items outside of a barcode that I recommend adding.
First, labeling the bottom shelf is usually a bad idea, and for pallet locations on the floor, this is not possible. In these cases, it is recommended to use an arrow to designate which of the two locations is correct and placing the labels side by side on the first beam. The left label is always the A position and is right aligned with the center of the pallet position.
Second, some operations use check digits to ensure the right product is picked or placed in/out of the correct location. This is also fine to add onto the label, although a barcode scan is always the most reliable.
Pallet Location Trees
If you are performing reach truck putaway or replenishment in a wide aisle, and you need the ability to scan a barcode to put or pick the pallet, then I recommend using location trees.
While I do not currently have a picture of one, these are positioned on the right and left side of the bay upright, with arrows point in the direction of the product, for locations that cannot be scanned due to distance.
These are typically placed about 5′ off the floor and contain mini location labels for the C, D, E, and F positions. Again, this is only the case where the person is not traveling via equipment to the location.
What Not to Do
Here are some examples of what not to do and the reasons why.
While using different colors, including label stock appears to add value, but it typically does not. It simply introduces additional variables for your mind to process.

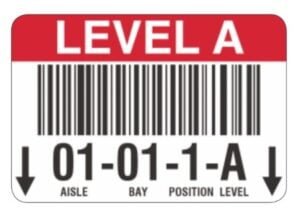
Communicating the same information in multiple formats is not needed. You must remember that your brain is going to process everything on the label and the more colors, letters, dashes, and numbers your have, the longer it takes your brain to react. These milliseconds add up over the years.
Pro Tip: Often times your team will try to convince you that reading a label the same way every time follows a learning curve, meaning once you know what to look for, and how to read the label, then the argument about it taking longer for your brain to process goes away. This is true for associates with years worth of experience. But why would you want to go through this every time with new associates? You don’t. Get it right the first time.
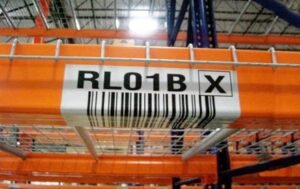
If you choose to use waterfall-type grading, make sure you adjust the size of your label. While this label turned out okay, there isn’t a need to purchase a 6″ label when you are only going to see 4″ of it. In addition, applying the label after the grading install is painful.
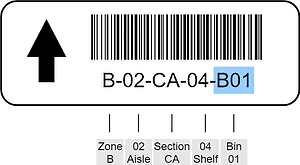
Really? This is where so many operations fail. If you are requiring your associates to remember this many characters, then you are killing your efficiency. Not to mention where to find this location.
Pro Tip: If you ask any member of management where a location is physically located, and the tell you to ask Inventory Control, you know you’ve failed. Where is location DMG-07? Only IC knows. Don’t let this happen.
Many times I see this in a warehouse and the response I get is the same, “they can just enter the information on their RF”. No – that is not how we roll.
Fix the label or better yet, purchase a quality label. Sometimes printing these labels ‘in house’ is not a cost savings initiative. And by the way, this is a symptom of another problem you haven’t solved.
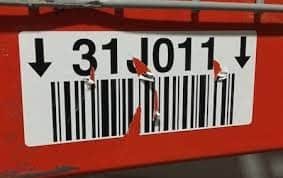
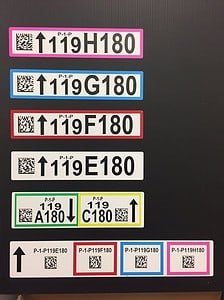
This is a great example of trying to put too much information on the location label. With that being said, the fifth label is a great idea – having one label with two locations on it so you can apply it to the first beam – you don’t want to put the A label on the ground. But where is B?
This logic only makes sense if you have adjacent locations with a shelf between A and C and you are keeping shelf C consistent with the rest of the aisle. For example, the first bay contains a full pallet (location A) and a shelf (location C). The second bay has a shelf (location B) in between A and C. This keeps shelf C consistent across the aisle.
Conclusion
Getting your location nomenclature correct from the beginning is critical to your success in making your locations easy to find. Getting this wrong will cost you productivity for years to come.
While we didn’t cover every location type, if you are looking for specific advice, please reach out to us and we will add to this blog article.


